
SPF/DKIM/DMARC: the setup that every company should have
Your emails end up in spam. Or worse: scammers send phishing emails in your name and your customers fall for them. Sounds like a nightmare? It’s a bitter reality for many SMEs – and often avoidable.
The solution is called SPF, DKIM and DMARC. Three technical abbreviations that sound like IT jargon but actually protect your digital business card. Since 2025, they are no longer optional: Google, Microsoft and Yahoo require these standards for anyone who sends more than 5,000 emails per day. If you ignore them, your emails will end up in spam – or won’t arrive at all.
In this article, you will find out what SPF, DKIM and DMARC really mean, why they are also indispensable for smaller companies and how you can set them up step by step – without studying IT and without expensive consultants.
Spoofing & business email compromise explained in 3 minutes
Before we get into the technology: Why is this important at all?
The problem: email spoofing
Imagine this: A scammer sends an email that looks like it’s from your company. Sender: rechnung@deine-firma.de. Subject: “Important: New bank details”. The recipient – perhaps a long-standing customer – unsuspectingly changes the bank transfer details.
The money ends up in the fraudster’s account. Your customer is angry. Your reputation is ruined.
The bitter truth: email spoofing is technically child’s play. Without any protective measures, anyone on the Internet can pretend to write in your name. Email technology was developed in the 1970s – nobody thought about security back then.
Business Email Compromise (BEC): The 26 billion dollar scam
According to the FBI, BEC attacks cause over 26 billion dollars worth of damage worldwide every year. The scam:
- Fraudsters research your company (website, LinkedIn, social media)
- You falsify an e-mail from the management or accounting department
- Urgent referral is requested (“Please process immediately, I’m in a meeting”)
- Employees or business partners pay – directly to the criminals
Practical example: A medium-sized craft business from Bavaria received a supposed invoice from a long-standing supplier in 2024 – same email address, same logo, only the IBAN had changed. 47,000 was transferred before the fraud was discovered. The money: gone. The supplier: frustrated. The trust: damaged.
The solution: SPF, DKIM, DMARC
These three technologies work together like a three-stage security lock:
- SPF (Sender Policy Framework): “These servers are allowed to send emails on my behalf”
- DKIM (DomainKeys Identified Mail): “This email is genuine and has not been tampered with”
- DMARC (Domain-based Message Authentication, Reporting, and Conformance): “If SPF or DKIM fail, throw the email away”
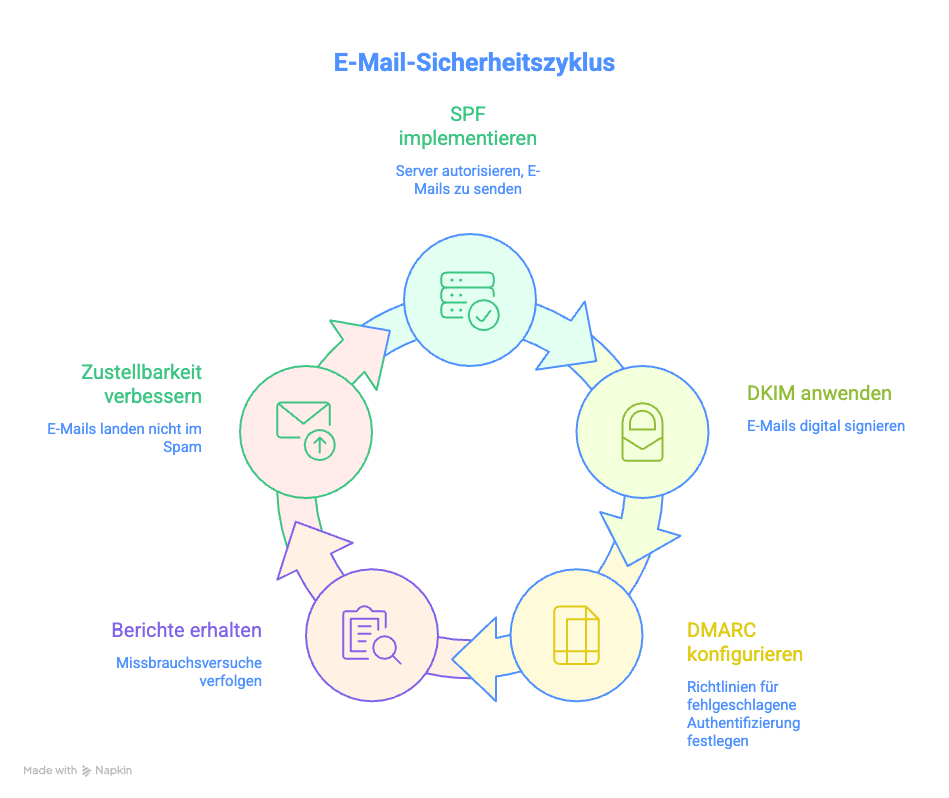
Together they ensure that:
- Fraudsters can no longer forge your domain
- Your real emails don’t end up in spam
- You receive reports on who is trying to abuse your domain
Important to know: Since May 2025, Google, Microsoft and Yahoo require these standards for bulk senders (5,000+ emails/day). Even if you send less: The recipient systems are becoming increasingly strict. If you are still without SPF/DKIM/DMARC in 2026, you risk massively poorer delivery rates.
SPF: Define sender (and avoid typical mistakes)
SPF is your first line of defense. It is a list of mail servers that are authorized to send emails for your domain.
How SPF works
When you send an e-mail, the recipient server checks:
- “Which IP address is this email coming from?”
- “Is this IP entered in the domain’s SPF list?”
- If yes → e-mail is accepted
- If no → Email is marked or rejected
Simple analogy: SPF is like a guest list at the door. Only those on it are allowed in and can speak on behalf of the host.
Create SPF entry: Step by step
1. create a list: Who sends emails for you?
Typical sources:
- Your email hosting (e.g. Microsoft 365, Google Workspace, Mailbox.org)
- Newsletter tools (e.g. Mailchimp, Brevo, CleverReach)
- CRM systems (e.g. HubSpot, Salesforce)
- Marketing automation (e.g. ActiveCampaign)
- Ticket systems (e.g. Zendesk, Freshdesk)
- Transactional emails (e.g. Shopify, WooCommerce)
Important: Don’t forget any! Missing entries = your own mails end up in spam.
2. assemble SPF entry
An SPF record is a DNS TXT record and looks like this:
v=spf1 include:_spf.google.com include:spf.protection.outlook.com -all
v=spf1→ Version of the SPF standard (always like this)include:_spf.google.com→ Google Workspace is allowed to sendinclude:spf.protection.outlook.com→ Microsoft 365 is allowed to send-all→ Everything else is rejected (strict rule)
What does that mean?
Other mechanisms:
ip4:192.0.2.1→ Allow specific IPv4 addressip6:2001:db8::1→ Allow specific IPv6 addressa→ Allow server with the A record IP of the domainmx→ Allow server in the MX record~all→ Mark everything else as “softfail” (softer rule)
Example of a typical SME setup:
v=spf1 include:_spf.google.com include:servers.mcsv.net include:spf.hubspot.com -all
This means: Google Workspace + Mailchimp + HubSpot are allowed to send, everything else is rejected.
3. store the SPF record in the DNS
- Go to your domain provider (e.g. IONOS, Strato, Hetzner, Namecheap)
- Open the DNS settings
- Create a new TXT record:
- Name/Host:
@or your domain (e.g.deine-firma.de) - Type: TXT
- Value:
v=spf1 include:_spf.google.com -all - TTL: 3600 (standard)
- Name/Host:
Important: DNS changes take time. It can take 24-48 hours until they are active worldwide (in practice often only 1-2 hours).
The 5 most common SPF mistakes (and how to avoid them)
Error #1: Multiple SPF records
❌ Wrong:
v=spf1 include:_spf.google.com -all
v=spf1 include:servers.mcsv.net -all
✅ That’s right:
v=spf1 include:_spf.google.com include:servers.mcsv.net -all
Why: Only ONE SPF record is allowed per domain. Multiple records lead to errors and mail servers do not know which one to use.
Error #2: More than 10 DNS lookups
SPF has a hard limit: a maximum of 10 DNS queries per record. Each include: counts as a lookup. If you have too many, SPF will fail.
Problematic:
v=spf1 include:spf1.com include:spf2.com include:spf3.com ... include:spf12.com -all
(12 lookups = too much!)
✅ So lution:
- Remove services that are no longer required
- Enter IP addresses directly instead of
include: - Use subdomain strategy (see below)
Tip: Test your SPF record with tools such as MXToolbox or Kitterman SPF Validator – they will show you the lookup count.
Error #3: Syntax error (space, typo)
❌ Wrong:
v=spf1 ip4: 192.0.2.1 -all
(space between ip4: and IP address)
✅ That’s right:
v=spf1 ip4:192.0.2.1 -all
Other common typos:
incldue:instead ofinclude:ipv4:instead ofip4:mxs:instead ofmx:
Error #4: Forgotten or outdated entries
You’re switching from Mailchimp to Brevo, but the old include:servers.mcsv.net remains in place? That’s dangerous:
- Too many lookups (see #2)
- Security risk: old services could be compromised
Best practice: Clean up your SPF record every 6 months. Ask yourself: Are we still using it?
Error #5: Wrong qualifier (+all or ?all)
❌ Disaster:
v=spf1 include:_spf.google.com +all
This means: “ALL may send in my name” – including fraudsters. Absolutely useless!
✅ That’s right:
-all→ Strict (recommended): Everything else is rejected~all→ Soft: Everything else is marked as suspicious
Recommendation: Use -all for maximum protection.
Test SPF
You should test after setting up:
- MXToolbox SPF Record Checker: https://mxtoolbox.com/spf.aspx
- Kitterman SPF Validator: https://www.kitterman.com/spf/validate.html
- Google Admin Toolbox: https://toolbox.googleapps.com/apps/checkmx/
Send yourself a test email and check the headers (for Gmail: “Show original”, for Outlook: “Message options”).
You should see:
Received-SPF: pass
DKIM: Signatures, keys, rotation
DKIM is the second component. While SPF checks WHERE a mail comes from, DKIM ensures that the mail has not been tampered with UNDERWAY.
How DKIM works
DKIM works with cryptography (similar to SSL certificates):
- Sending: Your mail server signs every outgoing mail with a private key (like a digital signature)
- Receive: The recipient server fetches the public key from your DNS
- Check: Does the signature match? Then the mail is genuine and unchanged
Analogy: DKIM is like a seal on a letter. If the seal is intact, the recipient knows that the letter has not been opened or altered.
Set up DKIM: Step by step
1. generate DKIM key
Most e-mail providers do this automatically:
Google Workspace:
- Admin console → Apps → Google Workspace → Gmail → Authenticate email
- “Generate new recording” → DKIM key is created
- You get a DNS entry to copy
Microsoft 365:
- Microsoft 365 Defender Portal → Email & Collaboration → Policies & Rules
- Activate DKIM → DNS entries are displayed
Mailbox.org, Ionos, Strato etc.:
- Often in the email settings under “DKIM” or “Authentication”
- Follow the provider’s instructions
Own server (Linux):
# OpenDKIM installieren
opendkim-genkey -s mail -d deine-firma.de
This creates two files:
mail.private→ Private key (keep it SECRET!)mail.txt→ Public key (in the DNS)
2. store the DKIM record in the DNS
You get a DNS entry that looks something like this:
mail._domainkey IN TXT "v=DKIM1; k=rsa; p=MIGfMA0GCSqGSIb3DQEBAQUAA4GNADCBiQKBgQC..."
What does that mean?
mail._domainkey→ Selector + subdomain (name varies)v=DKIM1→ DKIM versionk=rsa→ Key type (RSA encryption)p=...→ Public key (very long!)
Enter in the DNS panel:
- Name/host:
mail._domainkey(or what your provider specifies) - Type: TXT
- Value:
v=DKIM1; k=rsa; p=MIGfMA0GC...(complete key) - TTL: 3600
Important: The value is very long (several hundred characters). Some DNS providers automatically split this into several strings – that’s OK.
3. activate DKIM
Most providers require you to explicitly activate DKIM after the DNS entry:
- Google Workspace: Check the box “Enable DKIM signing for this domain”
- Microsoft 365: Toggle to “Activated”
- Own server: Start OpenDKIM service
DKIM key rotation: Why and how?
Why rotate?
Imagine your private DKIM key is compromised (server hack, insider threat). Then someone can forge emails in your name – even if SPF and DMARC are active.
Best practice: Change the key every 6-12 months.
How to rotate?
- Generate new key (other selector, e.g.
mail2024._domainkey) - Store both keys in parallel in the DNS (old + new)
- Change mail server to new key
- Remove old key from DNS after 48 hours
Practical tip: With Google Workspace and Microsoft 365, this happens automatically for the most part. You only have to enter new DNS entries occasionally if the provider requires this.
Test DKIM
After DKIM is set up:
- DKIM Validator: https://dkimvalidator.com
- Send a test e-mail to the address shown
- You will receive a report on whether DKIM works
- Check mail header:
- Send yourself a test e-mail
- View header (as with SPF)
- Search for:
DKIM-Signature:anddkim=pass
You should see:
DKIM-Signature: v=1; a=rsa-sha256; d=deine-firma.de; s=mail; ...
Authentication-Results: dkim=pass
DMARC: start with “p=none”, read reports, then harden
DMARC is the conductor that orchestrates SPF and DKIM. It tells the receiving servers: “If SPF OR DKIM fail, do the following…”
How DMARC works
DMARC checks two things:
- SPF alignment: Does the domain in the SPF check match the “From” address?
- DKIM alignment: Does the signed domain match the “From” address?
If at least ONE of them passes → DMARC pass. If both fail → DMARC fail.
What happens with DMARC fail?
YOU determine this with your DMARC policy:
p=none→ Do nothing, just reportp=quarantine→ Off to the spamp=reject→ Reject completely
DMARC policy: The 3 stages
Phase 1: Monitoring (p=none)
v=DMARC1; p=none; rua=mailto:dmarc@deine-firma.de
What happens:
- Recipient servers handle mails normally (even if they fail)
- You will receive daily reports to
dmarc@deine-firma.de - You see: Who is sending on my behalf? Where are there problems?
Duration: At least 4 weeks, preferably 8-12 weeks.
Why so long?
You must identify all email sources. Some newsletters only go out monthly, some systems only send out quarterly reports. If you go to quarantine too early, your own emails will end up in spam.
Phase 2: Quarantine (p=quarantine)
v=DMARC1; p=quarantine; pct=10; rua=mailto:dmarc@deine-firma.de
What happens:
- Mails that are DMARC fail end up in the spam folder
pct=10means: Only 10% of failed mails are sorted out (gradual introduction!)- You will continue to receive reports
Procedure:
- Start with
pct=10(10%) - After 1-2 weeks:
pct=25(25%) - After another 2 weeks:
pct=50 - Step by step until
pct=100
Important: Check the reports! Are your own mails ending up in spam? Then improve SPF/DKIM.
Phase 3: Reject (p=reject) – The goal
v=DMARC1; p=reject; rua=mailto:dmarc@deine-firma.de; ruf=mailto:dmarc-forensic@deine-firma.de
What happens:
- Mails that are DMARC fail are completely rejected
- They don’t even reach the spam folder
- Maximum protection against spoofing
Attention: There’s no going back here. Incorrect configuration = your mails will not arrive.
Additional tags:
ruf=→ Forensic reports (detailed for each error, note data protection!)sp=→ Policy for subdomains (e.g.sp=reject)adkim=→ DKIM alignment mode (s= strict,r= relaxed)aspf=→ SPF alignment mode
Example of a complete DMARC record:
v=DMARC1; p=reject; sp=reject; rua=mailto:dmarc@deine-firma.de; ruf=mailto:dmarc-forensic@deine-firma.de; pct=100; adkim=r; aspf=r
Read (and understand) DMARC reports
DMARC reports are XML files and look cryptic. Here is an example:
<feedback>
  <record>
    <row>
      <source_ip>192.0.2.1</source_ip>
      <count>42</count>
      <policy_evaluated>
        <disposition>none</disposition>
        <dkim>pass</dkim>
        <spf>pass</spf>
      </policy_evaluated>
    </row>
  </record>
</feedback>
What does it say?
source_ip: Which IP was sent from?count: How many mails?dkimDid DKIM work?spfDid SPF work?disposition: What was done? (none/quarantine/reject)
Problem: Raw XML reports are cumbersome.
Solution: Use DMARC analysis tools
Free tools:
- DMARCian (up to 1 domain free of charge)
- Postmark DMARC Monitoring
- MXToolbox DMARC Analyzer (limited free of charge)
What these tools show:
- Which IP addresses are sending on your behalf?
- How many mails fit/fail?
- Which services have problems?
- Visualized statistics instead of an XML desert
Typical findings from reports:
- “Oh, our old CRM is still sending emails – we forgot to enter that in SPF!”
- “Someone in China is trying to spoof our domain (and failing)”
- “Our newsletter tool has not configured DKIM correctly”
Store DMARC in the DNS
DMARC is also a DNS TXT record:
- Name/Host:
_dmarc(or_dmarc.deine-firma.de) - Type: TXT
- Value:
v=DMARC1; p=none; rua=mailto:dmarc@deine-firma.de - TTL: 3600
Start recommendation:
v=DMARC1; p=none; rua=mailto:dmarc@deine-firma.de; ruf=mailto:dmarc-forensic@deine-firma.de; pct=100; adkim=r; aspf=r
This means:
- Monitoring mode
- Reports to your e-mail address
- 100% of the mails are checked
- Relaxed alignment (more flexible, fewer false positives)
Test DMARC
- MXToolbox DMARC Checker: https://mxtoolbox.com/dmarc.aspx
- Google Admin Toolbox: https://toolbox.googleapps.com/apps/checkmx/
- DMARCian: Create a free monitoring account
The first reports should arrive in your mailbox after 24-48 hours.
Special cases: Newsletter tools, CRM, redirects, subdomains
The theory is clear. The practice? Often more complicated. Here are the most common stumbling blocks:
Newsletter tools (Mailchimp, Brevo, CleverReach etc.)
Problem: Newsletter tools send newsletters from their own servers, but with your sender address (newsletter@deine-firma.de).
Solution:
Option A: Use subdomain (recommended)
Instead of newsletter@deine-firma.de → newsletter@news.deine-firma.de
Advantages:
- Own SPF/DKIM/DMARC record for subdomain
- Main domain remains clean
- More control
Setup:
- Create subdomain (e.g.
news.deine-firma.de) - SPF record only for newsletter tool:
v=spf1 include:servers.mcsv.net -all - Store DKIM from the newsletter tool in the subdomain DNS
- DMARC for subdomain:
v=DMARC1; p=reject; rua=mailto:dmarc@deine-firma.de
Option B: Integrate newsletter tool into main SPF
v=spf1 include:_spf.google.com include:servers.mcsv.net -all
Attention: Counts as one of your 10 DNS lookups!
CRM systems (HubSpot, Salesforce, Pipedrive)
Problem: CRMs send automated emails, offers and reminders – often with your domain as the sender.
Solution:
- SPF: Add CRM to your SPF record
v=spf1 include:_spf.google.com include:spf.hubspot.com -all - DKIM: CRM DKIM key in the DNS (follow the CRM provider’s instructions)
- Custom domain: Many CRMs offer “custom tracking domains” (e.g.
track.deine-firma.de) – take advantage of this!
E-mail forwards
Problem: Employees forward mails from max@deine-firma.de to max.privat@gmail.com. SPF fails because Gmail is not in your SPF record.
Why: The mail comes from your server, but is forwarded by Gmail → SPF checks the original IP, which no longer matches.
Solution:
Option A: SRS (Sender Rewriting Scheme) Your mail server must support SRS (often standard with modern hosts). SRS rewrites the “return path” so that SPF works.
Option B: DMARC alignment via DKIM As long as DKIM matches, DMARC is OK (even if SPF fails). Make sure that your server signs DKIM.
Option C: ARC (Authenticated Received Chain) Newer protocol that “remembers” redirects and still authenticates them. Supported by Gmail, Microsoft and Yahoo.
Subdomains (marketing.your-company.com, store.your-company.com)
Best practice: Each active subdomain should have its own SPF/DKIM/DMARC records.
Why:
- Better control
- Separation of concerns (marketing ≠ transactional emails)
- Prevents a subdomain problem from affecting your main domain
Setup:
For shop.deine-firma.de:
SPF:
v=spf1 include:shopify.com -all
DKIM:
(Shopify-DKIM-Schlüssel)
DMARC:
v=DMARC1; p=reject; rua=mailto:dmarc@deine-firma.de
For unused subdomains:
Set a “zero” DMARC record to prevent misuse:
v=DMARC1; p=reject; rua=mailto:dmarc@deine-firma.de
Even without SPF/DKIM, this signals: “NOBODY is allowed to send here.”
Third-party services with their own sender domain
Problem: Some tools (e.g. ticket systems, forms) send from their own domain, but show your company as “Reply-To”.
Example:
- Sender:
noreply@ticketsystem.com - Reply-To:
support@deine-firma.de
Solution: You don’t need to do anything here! SPF/DKIM/DMARC only apply to the “From” domain (ticketsystem.com), not to “Reply-To”.
But: If possible, use a custom domain (e.g. tickets.deine-firma.de) for a more professional appearance.
Summary: Your 30-day checklist
Here is your concrete roadmap for SPF/DKIM/DMARC:
Week 1: Inventory
- [ ] List ALL e-mail sources (hosting, newsletter, CRM, store, etc.)
- [ ] Check current SPF record (if available):
dig TXT deine-firma.de - [ ] Check current DKIM status (analyze mail header)
- [ ] Check current DMARC status:
dig TXT _dmarc.deine-firma.de
Week 2: Set up SPF
- [ ] Create SPF record (include all sources)
- [ ] Pay attention to under 10 DNS lookups
- [ ] Store in DNS (TXT record at
@or domain) - [ ] Test with MXToolbox
- [ ] Send test mail and check header
Week 3: Activate DKIM
- [ ] Activate DKIM at the e-mail provider (Google/Microsoft/etc.)
- [ ] Copy DNS record from provider
- [ ] Store in DNS (e.g.
mail._domainkey) - [ ] Activate DKIM (in the provider panel)
- [ ] Test with DKIM Validator
- [ ] Send test mail and check header
Week 4: DMARC on monitoring
- [ ] Create DMARC record:
p=none - [ ] Create e-mail address for reports (e.g.
dmarc@deine-firma.de) - [ ] Store in DNS (TXT record at
_dmarc) - [ ] Test with MXToolbox DMARC-Checker
- [ ] Waiting for first reports (24-48h)
Weeks 5-12: Monitoring & optimization
- [ ] Check reports weekly (use tool such as DMARCian)
- [ ] Add missing SPF/DKIM entries
- [ ] Identify unknown IPs (legitimate or attacker?)
- [ ] Fix false positives
Week 13+: Hardening
- [ ] Set DMARC to
p=quarantine; pct=10 - [ ] Check reports: Do your own mails end up in spam?
- [ ] Increase step by step to
pct=100 - [ ] After 4-8 weeks:
p=reject - [ ] Celebrations 🎉
Frequently asked questions (FAQ)
Technically, you could just have SPF. But:
- Without DKIM: recipients trust you less, poorer delivery rates
- Without DMARC: No protection against spoofing, no reports on misuse
- Best practice: All three together
Short term: Nothing dramatic. Long term:
- Your emails end up in spam more often
- Google/Microsoft/Yahoo mark you as dubious
- Fraudsters can forge your domain more easily
- From 5,000 mails/day: Mails are blocked (Google requirement since 2024)
- SPF: 30-60 minutes
- DKIM: 30-60 minutes (if provider supported)
- DMARC: 15 minutes for
p=none - Monitoring: 4-12 weeks
- Hardening on
p=reject: Another 4-8 weeks
Total: 2-4 hours of work, 8-20 weeks of gradual roll-out.
Theoretically yes, practically: NO! 99% of the time you have some forgotten e-mail service that is then blocked. Always start with p=none.
Recommended: Yes. Minimum: For all subdomains that send emails.
- SPF/DKIM/DMARC itself: Free of charge (standard protocols)
- DNS management: Usually included in the hosting package
- DMARC monitoring tools: 0-50 €/month (depending on tool and number of domains)
- External support (if necessary): 150-500 € for one-time setup
No, not directly. They prevent OTHERS from misusing your domain for spam. You need antivirus filters and anti-spam solutions against incoming spam.
~all(softfail): “If it fails, that’s suspicious, but not certainly bad” → Mail is flagged, but usually delivered-all(Hardfail): “If it fails, it’s definitely wrong” → Mail is rejected
Recommendation: -all for maximum protection.
- Check the IP addresses: Own services or third parties?
- Own services: Supplement SPF/DKIM
- Strangers: These are probably spoofing attempts → good thing DMARC is blocking them!
Yes, but not recommended. DMARC needs at least SPF OR DKIM. For maximum security: both.
Checklist: SPF/DKIM/DMARC setup (PDF-Download)
Get the complete checklist as a PDF now:
✅ Step-by-step instructions for all three protocols
✅ DNS record examples for copy-pasting
✅ Common mistakes and how to avoid them
✅ Tools and links for testing
✅ 30-day project plan
Conclusion: Your email domain is worth its weight in gold – protect it
SPF, DKIM and DMARC sound complicated, but they can be set up in 2-3 hours. And the protection they offer is priceless:
- No more spoofing attacks in your name
- Better delivery rates (fewer spam flags)
- Compliance with modern e-mail standards
- Transparency about attempted abuse (DMARC reports)
2026 is the year in which email authentication will become mandatory – not just for large corporations, but for everyone. Those who act now will be prepared.
Do you need support?
Setting up SPF/DKIM/DMARC is doable, but sometimes you just want to make sure that everything is configured correctly. We are happy to help you – flexibly and without fixed contracts:
- Email setup check: We check your current configuration (30 min., from €49)
- Complete setup: We set up SPF/DKIM/DMARC for you (2-3 hours)
- Monitoring support: We analyze your DMARC reports and optimize them continuously
🗓️ Book a flexible appointment now
About itsupport.online: We are your partner for reliable IT support – online, throughout Germany and without a contract. From email security and cloud solutions to complete IT setups: you book exactly the help you need, when you need it.